
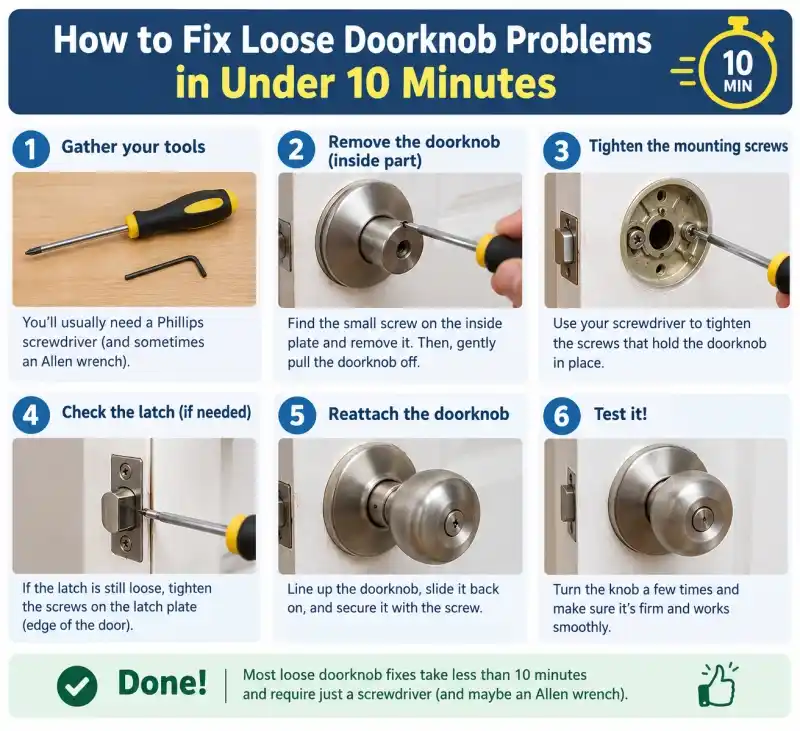
To fix a loose doorknob, you need to tighten the mounting screws holding the internal mechanism together, which are either visible on the plate or hidden beneath a decorative cover. For older vintage locks, tightening a small setscrew on the neck of the handle usually solves the problem instantly.
A rattling door handle is incredibly annoying. Every time you walk into your bathroom or pantry, that loud, clunky wobble reminds you of a growing honey-do list. Worse, a loose handle can eventually fail completely. Imagine getting stuck inside your own bedroom on a Friday night because the spindle disconnected inside the mechanism. It happens more often than you think.
Fixing it is a straightforward DIY task. You do not need to call a locksmith and pay a $75 service fee for something that takes less time than brewing a fresh pot of coffee. Let us walk through exactly how to secure that hardware once and for all.
Why Do Doorknobs Get Loose Over Time?
Mechanical things break down under constant friction. Think about your front door. It gets slammed when the wind catches it, pulled hard when you are carrying heavy groceries, and yanked by kids rushing outside to play. Every single movement sends vibrations through the steel threads of the internal screws.
Over a few years, those tiny vibrations back the screws out of their housing millimeter by millimeter. This creates physical gaps between the rose plate, the latch mechanics, and the wooden door itself. In a standard five-person household, a high-traffic interior door handle might experience over 10,000 cycles a year. That is a massive amount of physical stress for two tiny screws to absorb.
Sometimes the issue is not the screws at all. Wood expands and contracts based on seasonal humidity changes. In a sticky midwestern July, your wooden door swells. By January, dry furnace heat causes the wood to shrink. This natural movement compresses the wood fibers around the latch hole, leaving the metal housing sitting loose in a slightly oversized cavity.
The Three Tools You Need for the Job
Do not head to the toolbox with an armful of heavy power tools. Using an impact driver or a high-powered cordless drill on a door lock is a recipe for stripped threads and ruined brass finishes. Stick to basic hand tools so you can feel exactly how much resistance the metal is giving you.
- A standard Phillips-head screwdriver: A medium #2 size works best for 90% of modern residential door hardware.
- A flathead screwdriver: You will want a small, thin blade to pry off decorative trim covers without scratching the paint.
- A hex key (Allen wrench) set: Essential if you own modern lever-style handles or older antique brass hardware.
+---------------------+----------------------------------+------------------------------------+

| Tool Name           | Primary Use                      | Avoid This Mistake                 |
+---------------------+----------------------------------+------------------------------------+

| #2 Phillips Driver  | Tightening structural chassis     | Using a worn tip that slips        |
| Thin Flathead       | Prying off hidden faceplates     | Gouging the wood or metal finish   |
| Small Hex Key       | Securing neck setscrews          | Stripping the tiny internal socket |
+---------------------+----------------------------------+------------------------------------+
How to Fix Loose Doorknob Hardware Based on Your Handle Style
Before you touch a tool, look closely at your door. Different manufacturers use completely different engineering styles to hold their locks together. Pick the scenario below that matches the metal plate sitting against your door right now.
Style 1: Exposed Screws (The Easiest Fix)
This is the most common setup found on standard builder-grade hardware from brands like Kwikset. If you look at the interior side of the door, you will see two long screw heads sitting flush against the round metal plate.
Here is what you do:
- Hold the exterior doorknob firmly with your non-dominant hand to keep the entire assembly perfectly centered over the hole.
- Insert your Phillips-head screwdriver into one of the screws and turn it clockwise until it feels snug.
- Move to the second screw and tighten it an equal amount.
- Balance the tension between both sides. Do not crank one screw down completely before starting the second one, or the latch will bind up.
Here is a quick tip. If the screws keep spinning without ever gripping tight, the internal threads inside the receiving post are stripped out. You can add a single drop of medium-strength blue thread locker to the screw tips to help them bite and stay put over time.
Style 2: Hidden Screws Behind a Faceplate
Many premium brands like Schlage or Baldwin hide their mounting hardware to keep a clean, sleek look. If your metal rose plate is completely smooth with no visible screw heads, the fasteners are hiding directly underneath that decorative trim piece.
Now, do not just yank on the handle. Follow these specific steps:
- Examine the thin neck of the interior doorknob. You will spot a tiny hole or a small metal tab. This is called a detent pin.
- Press that pin inward using a paperclip, a small nail, or a tiny Allen wrench while pulling the knob straight off the shaft.
- Look at the bottom edge of the round rose plate against the wood. You will find a small notch designed for tool access.
- Slide your flathead screwdriver into that notch and gently twist the handle to pop the decorative cover free.
- Now you will see a heavy-duty steel mounting bracket held down by two large screws. Tighten them firmly.
- Snap the cover plate back on and slide the handle back over the spindle until you hear the detent pin click into place.
Style 3: Older Handles with an External Setscrew
If you live in a house built before 1960, you likely have classic glass or solid brass knobs that slide onto a square metal rod called a spindle. These do not rely on long internal screws through the door. Instead, they use a tiny screw right on the neck of the knob itself to clamp down on the flat edge of the spindle.
Fixing these requires a specific order of operations:
- Loosen the tiny setscrew on the neck of the handle by turning it counter-clockwise two full turns.
- Spin the entire doorknob clockwise down the threaded spindle until it sits tight against the door face.
- Back the knob off just a quarter turn so it can still spin freely without rubbing hard against the metal plate.
- Line up the setscrew precisely with the flat side of the square spindle rod. If you tighten it against a corner thread, it will wobble loose again by next week.
- Crank the setscrew down firmly using your flathead driver or hex key.
Common Doorknob Repair Mistakes to Avoid
Most people assume that tighter is always better. That is a massive misconception when dealing with door mechanics. If you use brute strength to tighten the structural chassis screws, you will compress the internal spring mechanism.
Have you ever used a door where the handle feels incredibly stiff, or it gets stuck in the down position after you turn it? That is the direct result of overtightening. It puts too much friction on the spring latch, causing the metal internal sliders to bind up. Tighten the screws until they meet firm resistance, then stop.
Another classic blunder is neglecting the latch plate on the edge of the door. If your handle is tight but the door still rattles when closed, the issue is actually the small metal tab inside the strike plate on your door jamb. You can use a flathead screwdriver to bend that little internal tab slightly outward, which creates a tighter seal when the door latches shut.
When Should You Skip the Repair and Buy a New Lock?
Sometimes a repair is just a temporary bandage on a dead lock. If you have tightened every screw but the handle still sags downward like a tired branch, the internal return springs are completely worn out or snapped. Metal fatigue cannot be fixed with a screwdriver.
If your hardware is over fifteen years old and has a gritty, grinding feel when you turn it, the zinc or brass internal gears are physically wearing away. At that point, head to the local hardware store and spend $25 on a fresh replacement. It will save you a massive headache down the road.
6. FAQ Section
How do I fix a doorknob that just spins and won’t open the door?
This usually means the setscrew on the neck of the knob has completely fallen out or sheared off, disconnecting the handle from the internal square spindle. To fix it, check the neck for an empty threaded hole, align the handle over the spindle, and install a replacement setscrew from the hardware store.
What size Allen wrench fits a doorknob setscrew?
Most modern residential door handles utilize either a 3/32-inch or a 1/8-inch hex key for their detent pins and setscrews. It is highly recommended to grab a cheap folding hex key set so you have both metric and imperial sizes on hand for testing.
Why does my doorknob keep coming loose again after I tighten it?
The internal metal threads within the lock chassis are likely worn down, allowing the screws to back out from daily door slamming. You can solve this permanently by removing the screws, applying a single drop of medium-strength blue thread locker to the threads, and reinstalling them.
Can I use WD-40 inside a loose doorknob mechanism?
No, you should never use standard WD-40 inside a door lock because it is a solvent that attracts household dust and lint, eventually turning into a sticky paste that gunks up the springs. Use a dedicated dry graphite lubricant or a silicone-based spray instead.
7. Conclusion
The single most important takeaway when learning how to fix loose doorknob hardware is to balance your tightening pressure evenly across both structural screws to keep the inner latch from binding.